

Introduction
Welcome to the world of Home Assistant my blessed peons; the ultimate open-source platform for automating and controlling your smart home. With its flexibility and powerful integration capabilities, Home Assistant transforms your domicile into a truly intelligent environment. But before diving into this promising adventure, let’s talk installation methods. The installation choice can significantly impact your own success with Home Assistant so let’s get right to it shall we!
Overview of Home Assistant Installation Methods
Home Assistant offers four primary installation methods: Home Assistant OS, Supervised, Docker, and Core. Each has its unique strengths and suitability, depending on your technical prowess, hardware, and how deep you want to dive into customization.
Diving into the Differences
Home Assistant OS: The Fully Integrated Experience
Pros: includes the operating system and Home Assistant itself, ensuring seamless updates and integrations.
Cons: It’s less flexible in terms of customization and may not be the best fit for those who like to tinker with their system extensively. Additionaly, you’ll need to dedicate a whole unit/server to utilise this method of installation.
Ideal User Profile: Home Assistant OS is a great all-rounder installation that will suit the needs of the vast majority of environments without the need to overcomplicate the experience.
Breakdown
Moreso than just being a beginner friendly, the Home Assistant OS is a brilliant solution for the user that enjoys building atop the wealth of customization that Home Assistant has to offer without having in-depth knowledge of networking, resource management, virtualised environments, and backup management; all of these additional pieces of management can either be a blessing or a curse depending on how much time you have to spare to troubleshoot your precious smart home when an issue inevitably rears its head.
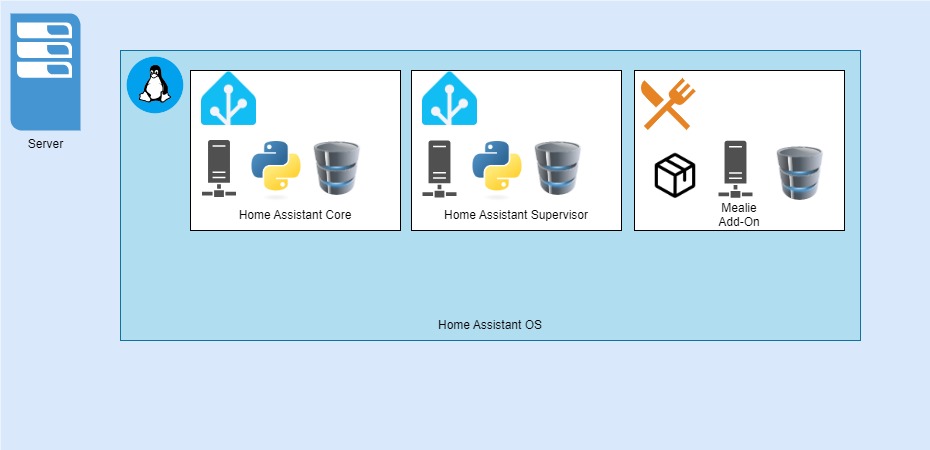
There’s also the possibility to run a VM containing the Home Assistant OS (hardware permitting) which would give the option of a fully managed solution that doesn’t require a fully dedicated machine to work its magic. In both of these scenarios, the supervisor and core, are both managed and pre-configured for the user which greatly simplifies troubleshooting (since the environment is more or less persistent across most installations) as well as the installation and management of Home Assistant Add-Ons. Here’s a breakdown of what a simple Home Assistant installation might look like with the inclusion of the Mealie an Add-On:
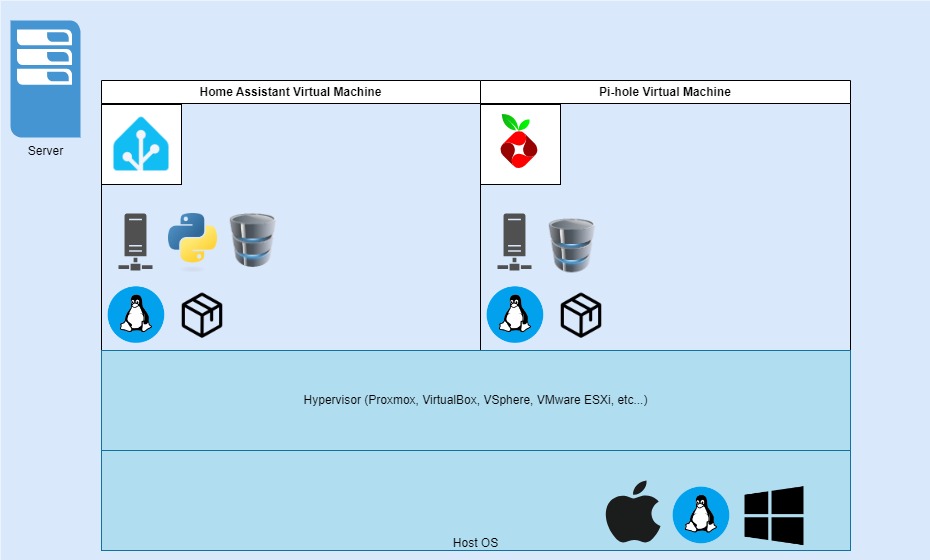
Running on a Virtual Machine, your layout setup might resemble something closer to this:
Supervised Installation: Best of Both Worlds?
Pros: Offers a balance between ease of use and customization. You get the full Home Assistant experience, including add-ons, with the freedom to run other applications on the same system.
Cons: Requires a bit more technical knowledge and maintenance than Home Assistant OS.
Ideal User Profile: Supervised in my opinion, is aimed at the intermediate user who requires a bit more customization and flexibility in their setup that isn’t offered in the plug-n-play setup of the full OS install.
Breakdown
Users who go for the Supervised installation typically should at least be somewhat familiar with using a Linux based system and Docker. The installation itself is more or less similar to running the Home Assistant OS (Diagram 1) as opposed to the Docker installation but in this case, the supervisor as well as the OS-Agent are both managed by the user.
What this means is that the user has access to the add-on store (via the supervisor) while also having full access to the Debian OS that’s required to host Home Assistant ( as opposed to the Home Assistant OS which reduces the user’s privileges by default). Honestly, there’s a wealth of automations that you could achieve as a power user using the full OS installation, but the Supervised installation of Home Assistant would be an option that I would consider if I hit any obstacles where the restrictions of HASS OS hampered my ability to complete an ongoing automation. Bear in mind that although you have the freedom to customize the Debian OS to your liking, the devs require a “freshly installed, fully updated Debian with no additional packages.”, so there is somewhat of a trade-off of flexibility for stability and support.
Docker Container: Customization for the Tech Enthusiast
Pros: Provides maximum flexibility and control, allowing you to run Home Assistant in a containerized environment alongside other Docker containers.
Cons: Lacks the integrated add-on store and some of the automated updates available in other installation methods. It requires a good understanding of Docker.
Ideal User Profile: Ideal for tech enthusiasts and those with a strong technical background who enjoy customizing and optimizing their setup.
Breakdown
Listen fam, the Dockerized setup is such a fun method of configuring Home Assistant; it allows the flexibility to spin up the container within a Linux environment alongside any supplementary containers that you’d require, since its a docker environment, all the dependancies and fussing over the pre-installation checklist are mostly handled by the pre-packaged environment; however, be warned that this method could require a bit more troubleshooting as you delve deeper down the rabbit whole as this is now stepping into the territory of user rights, security, allocation of resources for containers (if you’re running more than just Home Assistant), and networking if you’re interested in isolating the network traffic for your containers as well as handling your own updates/backups.
The the Dockerized setup can be a mesmerising experience, but if things begin to go wrong you’ll need to decide for yourself if the flexibility is worth the trade-off of having an environment where the bulk of this is already managed (which reduces the surface area of where things can south). Here’s a diagram of what the dockerized environment would look like if we had 3 seperate containers to integrate into Home Assistant (as opposed to Add-Ons):
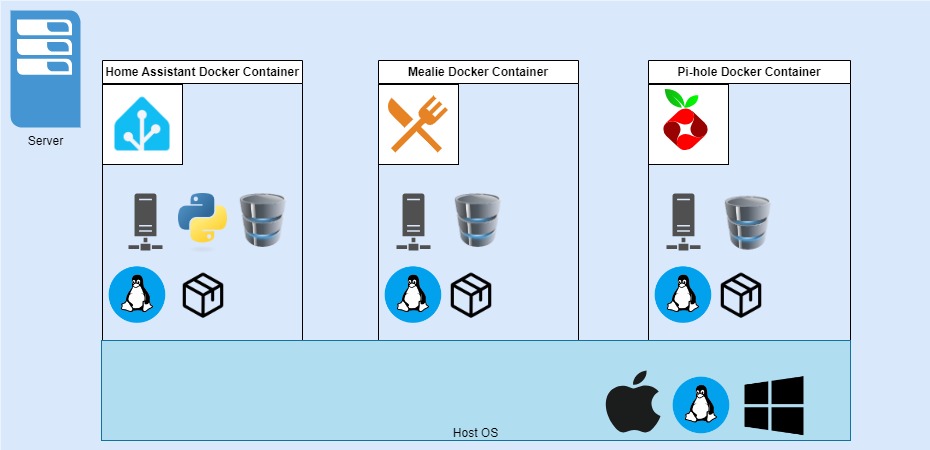
In the diagram above we can visualise a clear distinction between the self-contained environments for each container as they sit atop the resources of the host system. Each container can be siloed from the others based on resources, requirements, privileges, and networking, but they can also be linked together in the same manner as you see fit.
Home Assistant Core: The Minimalist Approach
Pros: Offers the core functionality of Home Assistant without additional layers, ideal for integrating into existing Python environments.
Cons: It’s the least beginner-friendly option, requiring manual setup for integrations and updates. You’ll miss out on the user-friendly interface of Home Assistant OS and Supervised installations.
Ideal User Profile: Best for developers or advanced users who prefer a minimal setup and are comfortable managing their Python environment.
Breakdown
I hear you, you’re a developer by day, developer by night, and an absolute glutton for punishment. Boy are you going to love Assistant Core! You see the world for what it is, ones and zeros. You could never bear the thought of taking the easy way out and you want to try your darndest and to endure this harsh and tormented world without the comfort of the add-on store and easily installed integrations. Curse the Supervisor the heavens! WHO NEEDS IT!??! In all honesty, it can be a treat to install and tinker about with, but just be warned that this won’t be for the feint of heart and those that aren’t willing to sink time and effort into their installation
Comparative Analysis
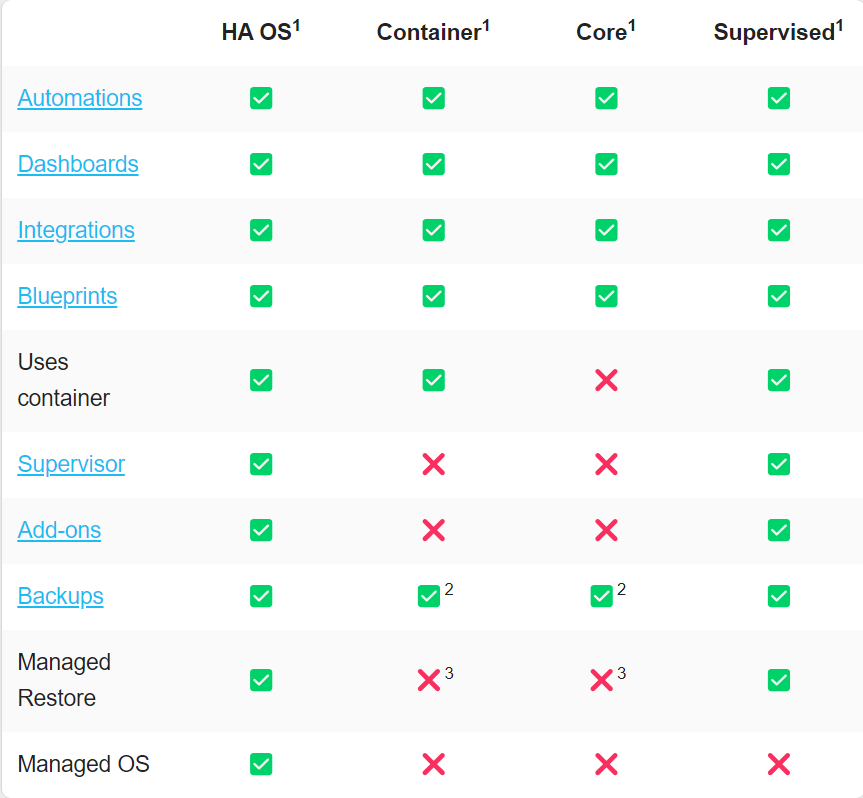
This information is freely available on the Home Assistant Installation Page but it is a great reference to compare the Pros and Cons of each installation method:
Conclusion: Tailoring Home Assistant to Your Needs
To conclude, I hope this has been a great exploratory dive into the various ways that you can install Home Assistant. Bare metal, Dockerised, Virtualised, Pythonised, or Weaponised; ideally, you will be able to narrow down which install is right for you, but if in doubt, the OS serves as not only a great starting point and learning tool, but also as a brilliant all-rounder for the many. Now go forth and install!